Server Side
The server side needs to take care of 4 major tasks:
- Generate QR String
- Webhook to receive authorization request
- Change user status
- Verify user status
How it works
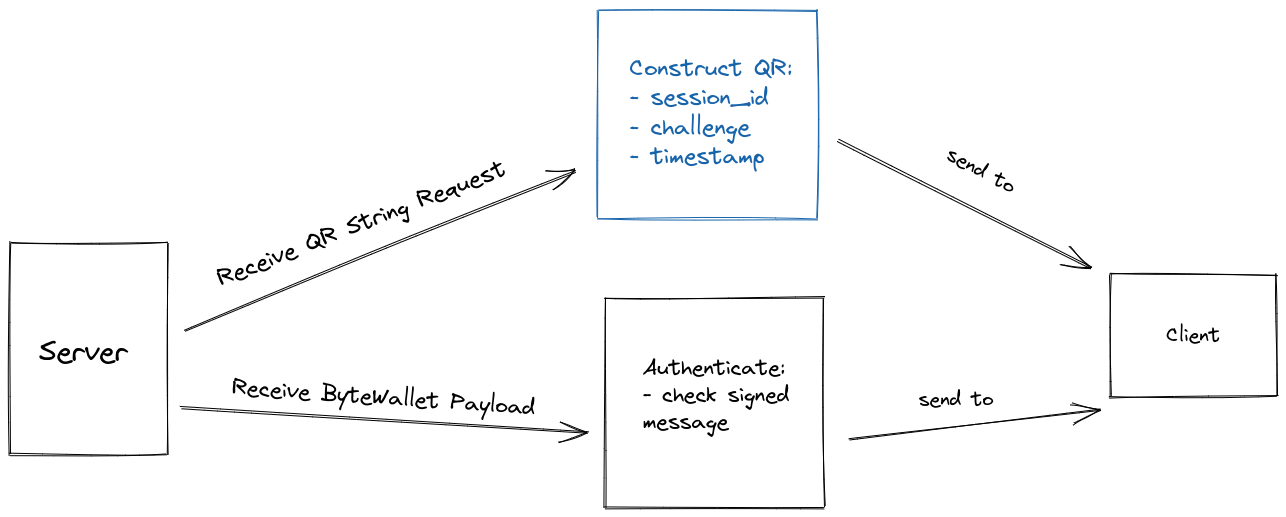
The server generates a QR code that the client will present and which our user will scan with their ByteWallet app. Once the user scans this QR code successfully, then the server will receive the response from the scanned QR code at its webhook route. The response thus received holds the key to allow the user to authenticate successfully inside the app. The response contains a signed version of the QR code (signed by the user's wallet's private key). If the signed message corresponds to the public key submitted then the user is authenticated successfuly and our server must redirect the user's session to the correct client side page to which access permission has thus been granted.
Display Client: Kiosks and/or Web Interface displaying QR code
Scan Client: ByteWallet app
Session Table (Optional)
In our examples we use this table to store sessions that we generate when a user loads the login page. The webhook function is then able to check the latest session challenge looking up the past few challenges to make sure the request is recent.
Security feature includes challenge phrase valid for 30 seconds-2 minutes to prevent snapshot of QR
There are many different session systems available, so feel free to use your own system.
CREATE TABLE `bf_fast_sessions` (
    `id` INT(10) NOT NULL AUTO_INCREMENT,
    `sid` VARCHAR(150) NULL DEFAULT NULL,
    `v` TEXT(65535) NULL DEFAULT NULL,
    `s` VARCHAR(50) NULL DEFAULT NULL,
    PRIMARY KEY (`id`) USING BTREE,
    UNIQUE INDEX `sid` (`sid`) USING BTREE
)
ENGINE=InnoDB
AUTO_INCREMENT=1;
Dependencies
The only server side dependency necessary is an implementation of Bitcoin ECDSA functions to verify a digital signature. See our examples for various libraries that accomplish this.
- PHP
- NodeJS
- Python
The followoing two libraries handle the math needed for ECDSA key pair handling:

sudo apt-get install php[8.x]-gmp

and

sudo apt-get install php[8.x]-bcmath

(depending on your apache configuration you may have to specify your php version number)

Install bitcoin signing package using composer


composer require bitcoin-php/bitcoin-ecdsa

use BitcoinPHP\BitcoinECDSA\BitcoinECDSA;
npm install bitcoinjs-lib
npm install bitcoinjs-message
pip install bitcoinlib
1. Generate QR Code
The QR code is the base of the authentication system. The QR code is a basic string that must contain the webhook (redirect) URL, sesion_id, challenge and timestamp.
This QR Code is generated on the server side and is implemented and shown on the client side of the application - typically on a login page. For example like this:
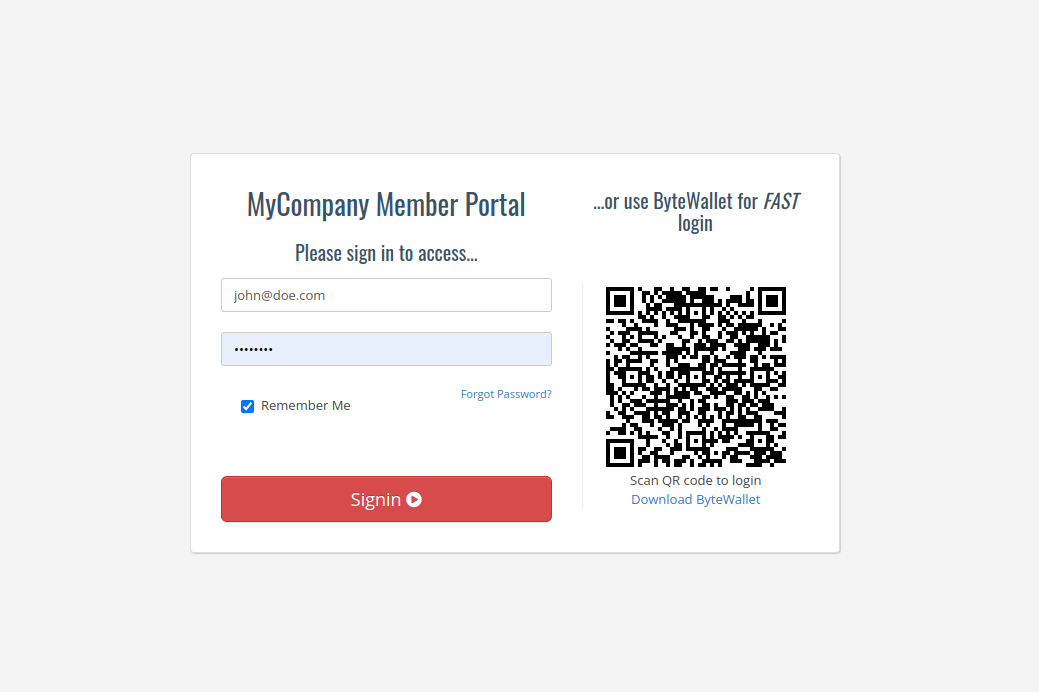
The QR Code is comprised of the following parameters:
Parameters
Request
session_id:
string=> unique token that a web server assigns a user for their sessionchallenge:
string=> mutual key phrase shared between server and clienttimestamp:
string=> hex encoded utc-timestamp of moment qr is generated
Response
We return the qr code string for the webhook redirect URL including our current session_id as sid as well as our current challenge c and the hex encoded timestamp t.
  qr: "https://my.website.com/api/fastbyte?sid=-ioAzu3w6AJaZ_uu7SnT7HTvJ6ddtFNQ_1660924354&c=xGOxY1TYHK8X0tiDuXl9XPDS3stIZzok_1660924504&t=62ffb258"
  sid: "-ioAzu3w6AJaZ_uu7SnT7HTvJ6ddtFNQ_1660924354"
  status: 0
Example
A client side script in the login page calls the server side webhook URL string generating function.
- PHP (Yii2)
- PHP (Laravel)
- NodeJS
- Python
  /**
     * QR Code generation
     *
     * Your login page javascript calls this QR-code-string generating API function every ~30 seconds to generate a new
     * challenge for your webhook URL which will be displayed in the login page using a javascript QR code library
     * converting the string returned from this function into a scannable QR code. The returned URL contains a link to
     * your webhook as well as the current session ID, current challenge and a timestamp. The timestamp allows ByteWallet
     * to check the request as being current. Use the session to store past challenges. In this example we limit the
     * session to no more than 4 past challenges (allowing for ~2 mins between scanning and webook request).
     *
     * GET
     * @link /api/getqrcode?sid=x
     * @param string $sid    your session token
     *
     * @return echo qr-code string.
     */
    public function actionGetqrcode()
    {
        $status = 0;
        if(Yii::$app->user->isGuest)
        {
            $bf_session = new Fast;                                                     //loading session table
            $session_string = Yii::$app->getRequest()->getQueryParam('sid');            //if session already exists, reuse
            if($session_string == 'null' || $session_string == "undefined"              //get a new session if not
            || empty($session_string) || is_null($session_string)){
                $session_string =  Yii::$app->security->generateRandomString()
                . '_' . time();                                                         //generating session string
                $bf_session->sid = $session_string;
                $bf_session->save();                                                    //storing new session
            }else{
                $bf_session = Fast::find()->where(['sid' => $session_string])->one();   //existing session located
            }

            $challenge = Yii::$app->security->generateRandomString() . '_' . time();    //generate new challenge

            $clist = $bf_session->v;                                                    //get session challenge list
            if(!empty($clist))
                $clist .= "," . $challenge;                                             //add new challenge
            else
                $clist = $challenge;

            $cs = explode(",", $clist);                                                 //remove the oldest challenges
            if(count($cs)>4)                                                            //keeping 2 minutes worth of
            {                                                                           //challenges at 30 sec QR code
                $a = array_slice($cs, -4);                                              //requests
                $clist = implode(",", $a);
            }
            $bf_session->v = $clist;                                                    //store updated challenge list
            $bf_session->save();

            $qr_image = "https://portal.bytefederal.com/api/fastbyte?sid="
            . $session_string . "&c=" . $challenge . "&t=" . dechex(time());            //return webhook URL with session string
                                                                                        //and latest challenge
        }else{
            $status = 1;                                                                //user is already logged in
        }
        $json = json_encode(array("qr" => $qr_image, "sid" => $session_string,
        "status" => $status));                                                          //encode json...
        Yii::$app->response->headers->add('Content-Type', 'application/json');
        Yii::$app->response->format = \yii\web\Response::FORMAT_RAW;
        echo $json;                                                                     //and return.
    }
Coming soon...
Coming soon...
Coming soon...
Make sure to store a buffer with the last few valid client/server challenges. This accounts for any lag time between client and server, and will ensure the user is able to authenticate.
2. Webhook Request
This function serves to receive and authenticate the signed message provided by ByteWallet. Once the ByteWallet user scans the QR code generated in Generate QR Code then a request will be sent to the endpoint created here so that your server can authenticate if the payload is signed with the corresponding private key.
Parameters
Request
msg: string =>
The end result of the QR code. The redirect URL is the webhook needed to post the authorization request to. This string contains the query parameters below.
session_id:
string=> unique token that a web server assigns a user for their sessionchallenge:
string=> mutual key phrase shared between server and clienttimestamp:
string=> utc-timestamp of moment qr is generated
pubk: string => user's provided public key
sig: string => signed msg with the users private key
addr: string => user's public address
Response
response: string => success/error message
Example
- PHP (Yii2)
- PHP (Laravel)
- NodeJS
- Python
     /**
     * Fast Byte Webhook.
     *
     * Your Webhook URL that receives a signed message from Bytewallet. It checks the current challenge (and optionally time)
     * and verifies that the incoming request was properly signed by a user who claims ownership over a certain public address.
     * When challenge matches and digital signature of the webhook URL itself is confirmed the user is authenticated. In this
     * example the webhook uses a session table to store recent challenges and upon successful authentication saves user's
     * public address to allow a frontend script checking status of the session to trigger a successful redirect.
     *
     * GET
     * @link /api/fastbyte?sid=x&c=y&t=z
     * @param string $c      your challenge token
     * @param string $sid    your session token
     * @param string $t      utctime in hex
     *
     * POST
     * @param string $pubk   user's public key (optional).
     * @param string $msg    this url itself
     * @param string $sig    signed message of this URL
     * @param string $addr   user's public address
     *
     * @return echo success/error message.
     */
    public function actionFastbyte()
    {
      try
      {
            $challenge = Yii::$app->getRequest()->getQueryParam('c');                   //the current challenge
            $session_string = Yii::$app->getRequest()->getQueryParam('sid');            //the session id
            $pubk = Yii::$app->request->post('pubk');                                   //user's pubkey
            $msg  = Yii::$app->request->post('msg');                                    //this being this URL
            $sig  = Yii::$app->request->post('sig');                                    //the signed message
            $address  = Yii::$app->request->post('addr');                               //user's public address

            $j = json_decode(Yii::$app->request->getRawBody());                         //in case the content
            if(empty($msg))                                                             //is posted raw
            {
                $j = json_decode(Yii::$app->request->getRawBody());
                $msg = $j->data->msg;
                $sig = $j->data->sig;
                $address = $j->data->addr;
            }
            $bf_session = new Fast;                                                     //loading our session table
            $bf_session = Fast::find()->where(['sid' => $session_string])->one();       //locating the session
            $clist = $bf_session->v;                                                    //loading past 4 challenges
            $all_challenges = explode(",", $clist);
            if (in_array($challenge, $all_challenges))                                  //is current challenge in
            {                                                                           //session challenge list?
                echo "found challenge...";
                $bitcoinECDSA = new BitcoinECDSA();                                     //loading Bitcoin crypto library
                if($bitcoinECDSA->checkSignatureForMessage($address, $sig, $msg))       //verifying signature
                {
                    $bf_session->s = $address;                                          //storing successfully signed
                    $bf_session->save();                                                //user's address in session
                    echo "User has been successfully authenticated";
                }
                else
                {
                    echo "Couldn't verify message";
                }
            }
            else
            {
                echo "no challenge found, sorry";
            }
        }
        catch (Exception $e)
        {
            echo "Error: " . $e;
        }
    }
Coming soon...
Coming soon...
Coming soon...
Caveat: The webhook function will receive your request from a different IP than the session was iniated with (customer's desktop computer on his home network, for instance and his cell phone with ByteWallet on a cellular network).
Make sure that the request can be received (cross site scripting prevention and same site stipulations might block the incoming request in your web framework).
If you get 500 (Internal Server Errors) on posting to the webhook, check for one of the following:
- Your Bitcoin ECDSA library is properly installed with all its requirements
- Your webhook receives address/msg/signature values
- Your own user lookup functions execute properly and don't run into database exceptions
3. Polling Authentication Status
This function serves to change the status of the user to authenticate into the site. If the public address (or optionally public key) exists for this particular session_id then the user has been successfully authenticated via the webhook. Now the user can be redirect to their access restricted page (for instance a dashboard page or account page).
Parameters
Request
- session_id:
string=> unique token that a web server assigns a user for their session
Response
response: string=> login status
We return a status variable in JSON letting the client side know whether the server successfully authenticated the user in the meantime.
  sid: "-ioAzu3w6AJaZ_uu7SnT7HTvJ6ddtFNQ_1660924354"
  status: 0 //when this session is still unauthenticated
  status: 1 //successful authentication detected
Example
- PHP (Yii2)
- PHP (Laravel)
- NodeJS
- Python
    /**
     * Polling authentication status
     *
     * If the user's signature has been verified by the webhook, the current session will contain the user's public address.
     * This function returns the appropriate status change when the authentication succeeds, allowing the frontend to redirect
     * the user to his account/dashboard...
     *
     * GET
     * @link /api/checkfast?sid=x
     * @param string $sid   your session token
     *
     * @return echo login status.
     */
    public function actionCheckfast()
    {
      try
      {
        $status = 0;
        $session_string = Yii::$app->getRequest()->getQueryParam('sid');                //retrieving the session variable
        $bf_session = Fast::find()->where(['sid' => $session_string])->one();           //retrieving the session
        if(!is_null($bf_session->s) && !empty($bf_session->s))                          //if user authenticated successfully
            $status = 1;

        $json = json_encode(array("sid" => $session_string, "status" => $status));      //create json object
        Yii::$app->response->headers->add('Content-Type', 'application/json');
        Yii::$app->response->format = \yii\web\Response::FORMAT_RAW;
        echo $json;                                                                     //return.
      }
      catch (Exception $e)
      {
        echo "Error: " . $e;
      }
    }
Coming soon...
Coming soon...
Coming soon...
4. Last but not least: Verify Status
The last piece serves to grant authentication and verify that the user is able to authenticate. A lookup is done on the user session_id. Then, the session_id is used to correspond to the public_key. If the public key matches with the signed msg then user is granted authorization and redirected to the dashboard.
Example
- PHP (Yii2)
- PHP (Laravel)
- NodeJS
- Python
     /**
     * Loading a Dashboard.
     *
     * We check the session's authentication status and use the webframework's login function to log the user in.
     *
     */
    public function actionDashboard()
    {
      try
      {
        $this->layout = 'dashboard';
        $session_string = Yii::$app->getRequest()->getQueryParam('sid);
        if(!empty($session_string))
        {
          $bf_session = Fast::find()->where(['sid' => $session_string])->one();
          if(!is_null($bf_session->s) && !empty($bf_session->s))
          {
            $identity = User:findOne(['pubk' => $bf_session->s]);
            if (Yii::$app->user->login($identity))
            {
              $data['body'] = "Logged in successfully!";
              return $this->render('dashboard', $data);
            }
          }
        }
      }
      catch (Exception $e)
      {
          echo "Error: " . $e;
      }
    }
Coming soon...
Coming soon...
Coming soon...
Whats Next?
Congratulations! Your user base should now be able to authenticate within your website with ByteWallet.
- You could offer payment options for crypto (your users have a wallet!).
- You could send rewards and bonus points to their wallet.
- Your users can convert crypto to fiat and fiat to crypto.
- You can add Byte Fast Auth to other pages.
- You could create (mini) webservices that solely use Fast Auth and without user meta data.